Moving between floors can be difficult in many buildings, especially for older adults, people with disabilities, or families with children.Without easy access, daily life becomes inconvenient and sometimes unsafe.
While an outdoor elevator can solve these problems and even save indoor space while adding property value, the installation is not simple. Unlike assembling furniture, it involves heavy equipment, strict safety rules, and expert planning. Trying to handle it without the right knowledge can lead to costly mistakes and safety risks.
This guide will show you the essential tools, materials, and key steps needed to install an outdoor elevator safely—so you understand the process and know when to rely on professional support.

Tools Needed to Install an Outdoor Elevator
Installing an outdoor elevator requires more than basic construction tools. Here are some of the most common ones:
- Measuring tools: laser level, tape measure, chalk line
- Construction tools: drill, cutting machine, welding machine
- Lifting tools: crane, pulley system
Safety equipment: helmets, harnesses, gloves
Materials Needed to Install an Outdoor Elevator
An outdoor elevator project also needs specific materials. These are the basics:
- Elevator system: cabin, guide rails, control cabinet, traction machine
- Structural parts: steel or glass shaft, concrete foundation
- Electrical system: cables, waterproof pipes, power supply box
- Safety devices: speed governor, buffer, guard rails
⚠️ All materials must meet international safety standards such as EN81 in Europe or the ADA in the United States. This ensures the elevator is safe, durable, and legally approved.
Steps to Install an Outdoor Elevator
Most outdoor elevators use a machine-room-less (MRL) design. This makes installation easier because no extra machine room space is needed. In this video, you can clearly see each step of the outdoor elevator installation.
1. Site Check and Design
First, the site must be checked carefully. Engineers need to use a laser level and tape measure to mark the exact width and depth of the space. The ground and concrete must be tested to make sure they can hold the elevator’s weight. They also look for pipes, beams, or windows that could block the shaft. After this, design drawings are made and building permits are requested from local authorities.
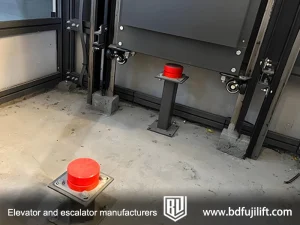
2. Foundation and Shaft Work
Next, the team pours a reinforced concrete base about 1 meter deep. Anchor bolts are set inside the concrete to hold the shaft. After the concrete dries, engineers build a steel frame or install glass panels to form the shaft. The shaft must be straight, checked with a plumb line or laser, and fastened to the building wall with steel brackets so it stays safe in wind and rain.
3. Installing the Elevator Parts
The main parts are installed step by step. Guide rails are bolted to the shaft wall and checked for straightness. The cabin frame is placed onto the rails and secured. The traction machine is fixed on a strong beam, with ropes or belts routed through it correctly. The control box is mounted in a spot that is easy to reach for use and repair. These parts together form the “heart” of the elevator.
4. Electrical and Safety Connections
Engineers pull power cables from the building’s main power box to the elevator’s control cabinet. The cables are placed inside waterproof pipes so rain cannot damage them. A lightning rod is mounted on top of the shaft, and a ground wire is connected to the earth to prevent shock. Safety devices are then added: emergency brakes on the guide rails to stop the cabin if it moves too fast, door locks to keep doors closed during travel, and sensors on the doors and floor stops so the elevator only moves when everything is safe.
5. Testing and Adjustment
The elevator is tested in detail. First, it runs up and down with no load to see if it moves smoothly. Then, weights equal to the maximum capacity are placed in the cabin to check if the motor can lift and lower safely. Engineers measure the travel speed with a stopwatch, make sure the cabin floor lines up exactly with each landing, and press the emergency stop button to confirm the brakes work. They also test door sensors by blocking the doors with a piece of wood to ensure the doors reopen instead of closing on the object.
6. Final Check and Approval
A certified inspector or local government officer checks every part of the elevator. They look at the permits, examine the shaft, test the emergency brakes, and review the wiring and control system. They also ride the elevator themselves to see if it runs smoothly and stops level at each floor. Only after passing all these checks is the elevator approved for public use.
Important Reminder: If you are a building owner or private homeowner, do not attempt this process yourself. Outdoor elevator installation involves strict safety rules and legal approval, and must be handled by a certified installation team.
Common Pitfalls to Avoid in Outdoor Elevator Installation
Even with a good plan, there are a few common mistakes that can ruin an outdoor elevator project. Think of these as red flags to watch for:
- Water management is critical in outdoor elevator installation If you skip proper drainage or waterproofing, rain and groundwater will quickly damage the shaft and equipment. Always plan for sump pumps, seals, and weatherproof coatings.
- Don’t ignore structural forces when building an outdoor elevator Outdoor towers face wind and sometimes seismic loads. If you underestimate them, the structure can shift or crack. Make sure calculations and reinforcements are in place from the start.
- Only use outdoor‑rated elevator parts Using indoor components outside is asking for failure. Buttons, panels, and wiring must be weather‑sealed and corrosion‑resistant.
- Plan for outdoor elevator maintenance access If technicians cannot safely reach machines, doors, or controllers, future repairs will be slow and expensive. Always include space and service doors in the design.