An elevator shaft is the area where the elevator travels between floors. It holds the elevator car and helps it move safely. Some shafts are made of concrete, others use steel or prefabricated parts.
In this guide, we will share what an elevator shaft is, how it works, and how to build one. We will explain the three main types of shafts and walk you through each step of the construction process—from digging the pit to final inspection.
What Is an Elevator Shaft?
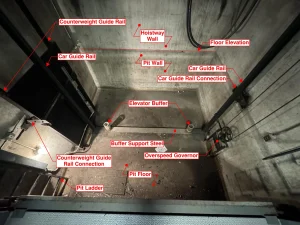
An elevator shaft is a tall, closed area built into the structure of a building. It gives the elevator a strong and protected path to work safely. Inside the shaft, you can find the elevator car, guide rails, cables, and sometimes a counterweight or hydraulic system.
A strong shaft helps the elevator run smoothly and last longer. It also keeps riders safe by making sure all parts stay in the right place.
There are different types of elevator shafts, each designed for different situations. Let’s look at the three main types and how each one works.
Overview and Explanation of the 3 Types of Elevator Shafts
There are three main types of elevator shafts. Each one uses different materials and building methods. Choosing the right elevator shaft helps the elevator run smoothly and safely. The most common types are concrete shafts, steel shafts, and prefabricated shafts.
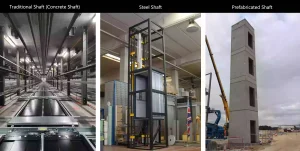
Traditional Shaft (Concrete Shaft)
This type of elevator shaft is made by pouring concrete at the building site. It is very strong and works well in tall buildings. A concrete elevator shaft also helps reduce noise and support heavy elevator parts. But it takes more time and more workers to build.
Steel Shaft
A steel elevator shaft is made from metal beams and panels. It is lighter than concrete and much faster to build. This type of elevator shaft is a good choice for smaller buildings or places with limited space. Some builders also add glass to give it a modern look.
Prefabricated Shaft
This elevator shaft is made in a factory and delivered to the site. It is ready to install right away, which saves time and lowers cost. A prefabricated elevator shaft is often used in homes, stores, or small offices.
Each kind of elevator shaft is built for different needs, but they all have the same main parts inside. Let’s look at what’s inside a typical elevator shaft.
Internal Structure of Elevator Shaft
The main part inside the shaft is the elevator car, where people or goods ride. The car moves up and down on guide rails, which keep it in the right position. These rails are attached to the shaft wall and help stop the car from shaking or moving sideways.
In many shafts, this includes steel cables and a motor placed at the top. Some shafts, especially in shorter buildings, use a hydraulic cylinder that pushes the car up from below. These parts are all built into the shaft and work together to lift the elevator safely.
Some elevator shafts also include a counterweight. This heavy object balances the car and helps the motor use less energy. When the car goes up, the counterweight goes down, and the other way around.
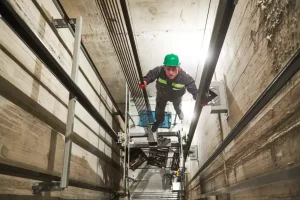
At the bottom of the shaft is the elevator pit. This space holds safety equipment like buffers, which help stop the car if it goes too low. It also gives space for emergency brakes and inspection tools. It also helps with inspections and maintenance.
If you want to know more detailed information about elevator shafts, read: What is an Elevator Pit? Why is it Needed?
Purpose of Elevator Shaft
The elevator shaft is more than just a space—it has many important jobs.
Let’s explore the main functions of an elevator shaft.
Safe Travel Between Floors
The shaft gives the elevator car a protected space to move up and down. It keeps the car on the right path and makes sure it doesn’t shake or move side to side. The guide rails inside the shaft help the car stop safely at each floor.
Support for Elevator Parts
Inside the shaft, you’ll find cables, counterweights, motors, or hydraulic pistons. These parts help the elevator move. The shaft supports all them and keeps them in the right place. This setup also makes maintenance and repair easier.
Fire and Safety Protection
Many elevator shafts are built with fire-resistant materials. This helps protect people if there’s a fire in the building. The shaft also has space for safety systems like brakes and buffers that stop the car in an emergency.
Elevator shafts are strong, safe, and smart parts of every building. Without them, elevators wouldn’t work at all.
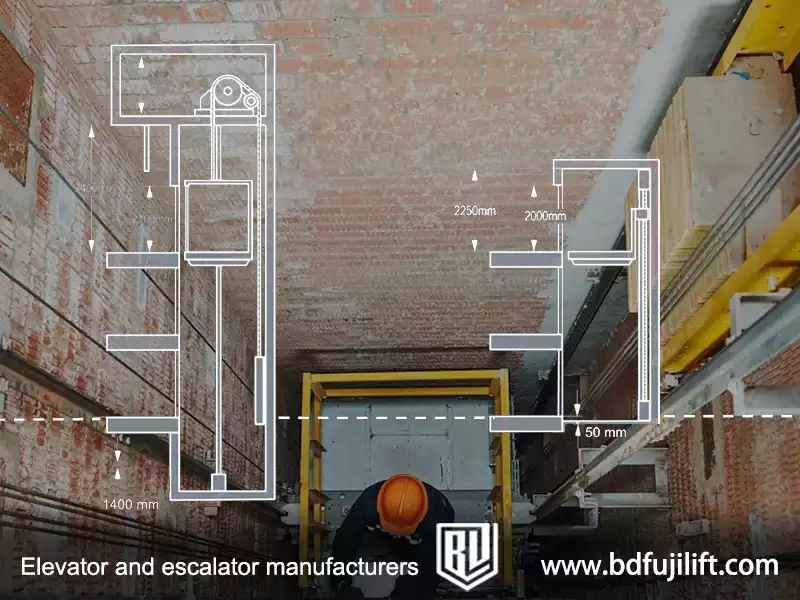
Elevator Shaft Dimensions
Shaft size depends on many things—like the type of elevator, number of stops, and how much space the building has. To help you understand what size you may need, see the table below for common elevator shaft dimensions by type.
| Elevator Type | Typical Shaft Width (mm) | Typical Shaft Depth (mm) | Notes |
|---|---|---|---|
| Passenger (6-person, 630kg) | 1800–2000 | 1600–1800 | For standard machine-room-less (MRL) design |
| Passenger (13-person, 1000kg) | 2300–2500 | 2100–2500 | For mid-rise buildings |
| Freight (Class A, 2000kg) | 2800–3000 | 2500–2800 | For general cargo and large trolleys |
| Freight (Class C2, 3000kg+) | 3200–4000 | 3000–4200 | For heavy-duty trucks or pallets |
| Hospital Bed Elevator | 2500–2800 | 2300–2600 | Fits hospital bed with nurse |
| Home Lift (Small) | 1200–1500 | 1200–1400 | For 2–3 person lifts, limited speed and stops |
Note: Shaft dimensions are for general reference only. Actual elevator shaft design must follow local building codes and the specifications of your elevator supplier.
How to Reserve Elevator Shaft Space
1.Choose the Type of Elevator Shaft
Pick the right kind of elevator shaft. The common types are steel structure shafts, brick and concrete shafts, and aluminum alloy shafts.
2.Make Sure the Shaft is Big Enough
It’s a good idea to talk to the elevator company early. They can send an expert to measure the space and give advice on the right size. If the builder has already planned the shaft size, you can just tell the elevator company, and they will suggest the best elevator brand, size, and model for you.
3.Make Sure the Top Floor Height is Enough
The height of the top floor should be around 3.5 meters. The size of the shaft and the elevator cabin can change the top floor height. Also, the top of the shaft must be closed off, not open to the outside.
4.Leave Space for the Pit
Elevators need a pit at the bottom, and its depth depends on the elevator type and brand. Make sure the pit is waterproof to avoid any water problems in the future.
5.Plan for Reinforcement Beams
Follow the elevator company’s design plans to know where to put the beams needed to hold the elevator tracks and parts. Also, make sure there are concrete beams above and below each door opening.
6.Leave Space for the Hook
For the most common type of elevator, the traction elevator, you’ll need to leave space at the top of the shaft for a hook.
Control Cabinet Location
The control cabinet is usually installed on the left side of the top floor’s elevator door. If the design changes, you’ll need to talk to the elevator company to make sure the cabinet is still easy for maintenance workers to access.
How to Measure the Elevator Shaft Size
When getting a quote for the elevator, the elevator company will usually ask for the shaft size. You can find these details on the building’s plans. If you don’t have plans, you can measure it yourself.
Measure the Shaft Width
Stand at the elevator door and measure the space between the two walls of the shaft. Measure this at every floor to make sure the space is the same on every level.
Measure the Door Opening
Measure the width and height of the door opening and also the distance to the lift hole. Check if the door is centered in the shaft.
Measure the Floor Height
Measure the distance between two floors, from one floor’s ceiling to the next floor’s floor. Add the thickness of the floor to this measurement.
Measure the Top Floor Height
Measure from the finished floor to the underside of the top of the shaft.
Measure the Pit Depth
Measure from the finished floor of the lowest floor to the bottom of the pit.
Check the Shaft Structure
If the shaft is made of brick and concrete, check if there are any support beams. Measure their spacing if there are any. The beam design might be different from the plan, so keep an eye on that.
Measure the Machine Room
Measure the length and width of the machine room. Make sure it’s positioned correctly relative to the shaft.
Measuring the Shaft in Different Conditions
For New Buildings
If the building design isn’t done yet, the elevator company will give you a standard layout to help design the shaft. If the building is already designed, they’ll measure the space based on the building plans.
For Replacing Old Elevators
If the old elevator is removed, you can measure the shaft the same way as for a new one. If the old elevator is still there, try to gather information about the machine room and door sizes from outside the shaft.
Elevator Shaft Construction Process
Building an elevator shaft starts with choosing the right type. There are three common types: concrete, steel, and prefabricated shafts. Prefabricated shafts are made in a factory and then brought to the site for quick setup. The other two—concrete shafts and steel shafts—must be built on-site before the elevator can be installed. The next sections explain how concrete and steel elevator shafts are built step by step.
Concrete Shaft Construction Process
Building a concrete elevator shaft takes several important steps. Each step must be done carefully to make sure the elevator runs safely and smoothly. Let’s look at the full process from design to final inspection.
1. Design
Every project starts with a clear plan. Builders work with engineers to design the elevator shaft and the elevator pit at the bottom. The design must match the building’s size, the number of floors, and the type of elevator. Good planning helps prevent mistakes later.
2. Excavation of Elevator Shaft and Pit
Once the design is ready, workers dig the space for the elevator shaft and pit. The pit is the lowest part and gives room for safety systems. This step must be done with care to make sure the space is deep and wide enough.
3. Concrete Pouring of Pit Wall and Ground
Next, builders pour concrete to form the floor and walls of the elevator pit. Strong concrete keeps the pit stable and supports the elevator equipment above it. After the pit is done, the shaft walls are poured upward, floor by floor.
4. Drainage System and Equipment Installation
A drainage system is added to keep water out of the elevator pit. This helps protect the elevator from rust and damage. Builders also install pipes and wires needed for future elevator work.
5. Waterproof Sealing Treatment
To stop water from leaking into the shaft, builders use waterproof paint or sealing materials on the walls and floor. This step keeps the elevator area dry and safe over time.

To learn more about ensuring elevator pit waterproofing methods, check out our dedicated article “How to Ensure Elevator Pit Waterproofing?” which provides detailed steps.
6. Final Inspection and Acceptance
Before the elevator is installed, inspectors check the shaft and pit. They look at the size, strength, and safety of the space. If everything is done right, the project passes, and the elevator can be added next.
Steel Shaft Construction Process
Steel elevator shafts are often used in buildings where speed and flexibility are important. These shafts are built with strong metal beams and panels, and they can be put together faster than concrete shafts. Here’s how the construction process works:
1. Design
Engineers and builders create a plan that shows the size and shape of the steel elevator shaft. They also plan how the shaft will connect to the rest of the building. Good design helps the shaft stay strong and safe.
2. Build the Steel Frame
Workers start by building the frame of the shaft using steel columns and beams. These metal parts are bolted or welded together. This frame gives the elevator shaft its shape and strength.
3. Install Shaft Panels
Next, steel or metal panels are added to close the sides of the shaft. These panels may be solid or have glass, depending on the design. The panels protect the elevator and give the shaft a finished look.
4. Add Support and Connection Parts
Builders install brackets and guide supports inside the shaft. These parts help hold the elevator guide rails and keep them straight. Openings for doors on each floor are also added at this stage.
5. Check for Alignment and Safety
After the frame and panels are in place, the team checks that everything is straight, secure, and ready for the elevator system. Safety checks are done before the next step—installing the elevator itself.
Steel shafts are strong, quick to build, and easy to customize. That’s why they are often used in houses, offices, schools, or places where a new elevator needs to be added to an old building.

Elevator Shaft & Pit FAQ
What is the difference between an elevator pit and an elevator shaft?
The elevator shaft is the vertical space that runs through the building. It houses the elevator car, guide rails, cables, and other components. The elevator pit is a small space at the bottom of the shaft. It provides room for safe stopping and holds safety devices and drainage systems.
Why do we need to build the elevator shaft first?
The shaft must be completed before installing the elevator. It provides a secure path for the elevator to travel and supports all critical components. Without the shaft, the elevator system cannot function.
Why are elevator shafts so deep?
Elevator shafts are deep because they include the pit at the bottom. The pit allows space for the car to stop safely, even during emergencies. It may also house equipment like buffers, drainage, or other safety systems.